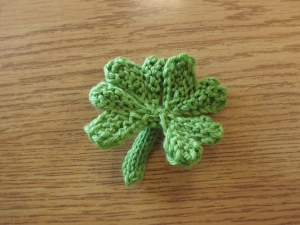
Otto is getting into the spirit~
If you have come by the shop in the last week or so, you might have caught me madly knitting away at some tiny green project – clovers! After searching through the ravelverse for a free knit clover pattern, I couldn’t find one that didn’t involve breaking the yarn after every leaf to seam them all together afterwards. What to do? This pattern is the result, and I’m more than happy to share it with you all for free so you can knit some luck into your life!
Requirements
Yarn – Green yarn! Great for leftovers. Yardage will depend on yarn weight and the number of leaves you do, but it doesn’t take much in any case.
Needles – Gauge is not incredibly important, I would recommend going with the size recommended on the yarn label or a bit smaller. DPN’s are incredibly handy for this small work.
Terms
K – knit
kfb – knit into the front and back of the next stitch – this increases one stitch into two
W&T – bring the yarn to the front of the work, slip the next stitch from left needle to right unworked, bring the yarn to the back of the work, return the stitch back to the left needle, return the yarn to the front of the work, and turn
sl1 – slip the next stitch to the right needle unworked
k2tog – knit the next two stitches together as if they are one stitch – this decreases two stitches into one
kwtog – the next stitch is a wrapped stitch – using the right needle, pick up the ‘wrap’ and put it onto the left needle, now knit that wrap together with the stitch it was wrapped around
Pattern Instructions
First Leaf
Cast on 7 stitches
Row 1: K1, kfb, K3, W&T (8 stitches)
Row 2: K to end of row
Row 3: K1, kfb, k2, w&t (9 stitches)
Row 4: K to end of row
Row 5: K1, k2tog, K2, knit w tog w st, K1, turn
Row 6: sl1, K to end
Row 7: K1, k2tog, past K1 over the k2tog, K1, pass k2tog over said K1, K2, kwtog, K1 (5 stitches)
Row 8: K4, kfb, cast on 1 (7 stitches)
Row 9: K1, kfb, K3, w&t (8 stitches)
Row 10: K to end
Row 11: K1, kfb, K2, w&t (9 stitches)
Row 12: K to end
Row 13: K1, k2tog, K2, kwtog, K1, turn (8 stitches)
Row 14: sl1, K to end
Row 15: K1, k2tog, pass knit over k2tog, K1, pass k2tog over K1, cont bind off til reach wrapped st (2nd last st from end), kwtog, bind off so that there is only the one final st remaining
Additional Leaves
With 1 stitch still left on needle from prev leaf, cast on 6 stitches (7 stitches)
Repeat rows 1 – 15 of leaf pattern
Stem
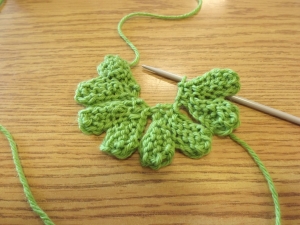
When you have your desired number of leaves, it is time to join them, either by seaming them together or by picking up one stitch from the bottom of each leaf and knitting them together with the one st left on your needle.
To then knit a stem, pick up 3-5 stitches (depending on number of leaves) from the center and knit an i-cord to desired length.
i-cords are easiest if you use double pointed needles;
K all, move dpn from right hand back to left, K all. In this way you are drawing the yarn across the back of the K4 which will close the circle. Repeat until it is as long as you like.
With straight needles;
K all, slip these four stitches back onto the left needle, K all.
For the final row, k2tog, k2tog, pass first k2tog over second, break yarn and pull through final stitch – finished! Weave in your ends.
Alterations
- if you would like, you could bind off all stitches, and repeat the first leaf however many times and then seam them together later.
- you might slip the first stitch of the outside leaf edge (the first stitch of all odd-numbered rows) in order to create a prettier edge
- you might add detail to the leaf by using leftovers or the weaving in the tail to create the ‘veins’
- if the leaves aren’t closing together as you’d like, you might use the tail to weave through and draw them together
- add a safety pin to turn it into a cute, seasonal addition to your coat!
Please let me know if you find any errors or if anything is unclear. Have a fantastic St. Patrick’s Day!


One thought on “Happy St. Patrick’s Day – Free Clover Pattern!”